100 Cello Warm-ups and Exercises Blog 20: Thumb Position and the Upper Registers (Part 2)
Robert Jesselson
In the first part of this series on thumb position (Blog #19), we discussed the basic techniques for understanding the geography of the upper registers of the cello. There are three concepts for knowing the “latitude and longitude” in this part of the instrument:
1. Using nodes and other fixed points for reference
2. Measuring distances:
a) understanding and using intervals
b) the “Configuration of the Hand” across string
3. Using the basic thumb position, as described above, and organizing the finger spacing with tetrachords
We looked at #1 and #2a in Blog #19. Next we will discuss the “Configuration of the Hand.”
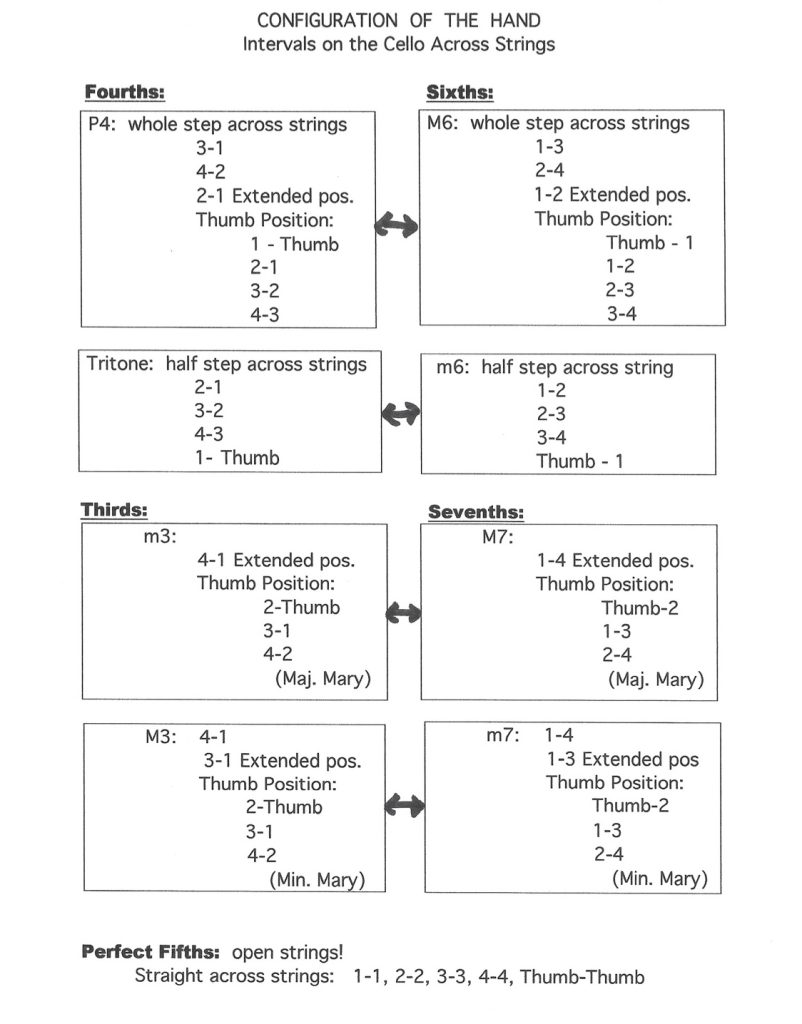
2b. Configuration of the Hand
Knowing the intervals and distances on one string is vital in understanding the geography of the upper part of the cello. But one still needs to know how notes relate across the strings. For this it is important to understand the intervals that are created when you play two notes on two neighboring strings. I address this with a system that I call the “Configuration of the Hand”, in which we explore all the combinations of the fingers across two strings.
Here is a chart with all the combinations of the fingers for playing different intervals. Notice that the fingerings are reversible for fourths and sixths, and for thirds and sevenths (in reading the fingerings, the first number is for the finger is on the lower string, the second number is for the finger on the higher string. For example, 3-1 means 3rd finger on the D string and 1st finger on the A string, producing a P4).
It is important to know these fingering combinations for playing across strings in the upper part of the cello.
3. Tetrachords
As discussed previously, it is important that the basic thumb position is stable and consistent. In other words:
- the octave or P4 relationship between the thumb and 3rd finger must be clear and the intonation solid
- the “inny and the outy” shape of the thumb must be consistent
- there should be a C-shape between the thumb and the first finger so that the knuckles are not squashed down
- the fingers should be round
- and the fingers should be strong enough so that joints don’t collapse.
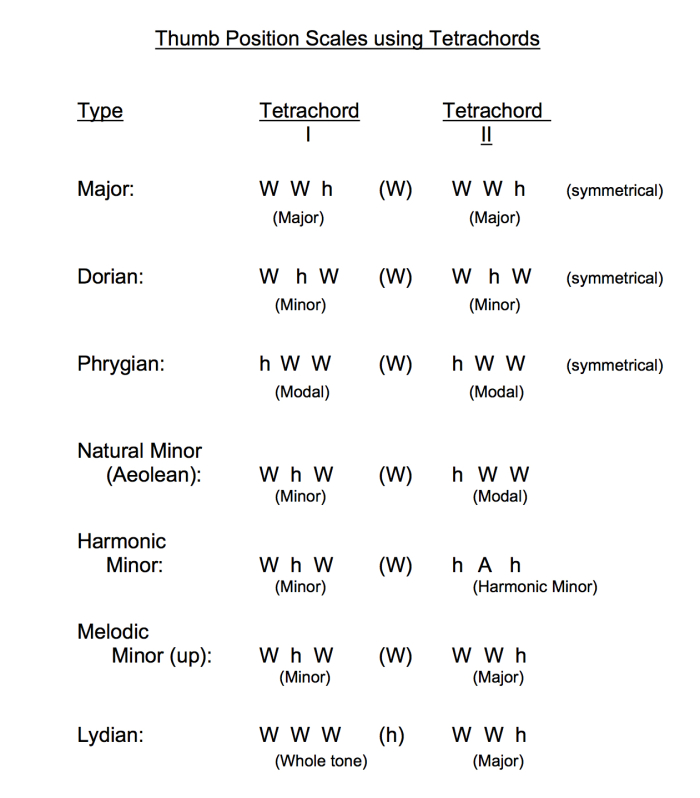
The next important step in creating a usable thumb position is figuring out the spacing between the other fingers within the octave (or P4) frame. Since we can play four notes with the four fingers in thumb position (using thumb, 1,2,3) it is useful to identify the various possibilities as tetrachords (four note groupings), giving them names. The most common tetrachords are:
Major: W W h
Minor: W h W
Modal (Phrygian): h W W
Octotonic: h W h
(W=whole step; h=half-step; A=Augmented 2nd)
Notice the relationship of the first three to the Marys that were discussed in an earlier Blog (#17) – the intervals from the bottom up are the same. All of them are named after the scales that they initiate. The Harmonic Minor Tetrachord is used in minor scales, with an Augmented Second between the 2nd and 3rd fingers:
Harmonic Minor: h A h
We also have Tetrachords in which the interval between the thumb and the 3rdfinger is bigger or smaller than our standard octave or P4. For example the Chromatic Tetrachord, the Lydian Tetrachord (named after scales that begin this way). The Gypsy Tetrachord, and two others are used less often in western music, but they do occur and it is useful to practice them.
Chromatic: h h h
Lydian (whole tone): W W W
Gypsy: W h A
W h h
h h W
I find it helpful to do a variety of different scales in thumb position, recognizing that scales are made up of two tetrachords. In the following chart I present some of the many possibilities of scale systems using thumb position tetrachords. The first three are symmetrical scales, with the same tetrachord on both strings. The others use a variety of combinations of tetrachords. They should be practiced in all keys going up the cello. The ( w ) or (h) in the middle column indicates the interval (whole step or half step) between the third finger and the thumb as we cross strings. In the Locrian, Whole Tone and Octotonic scales the thumb has to move back a half-step during the string crossing. In the Octotonic scale we need to use the 4th finger as well.
Of course sometimes the interval between the thumb and 3rd finger will be much bigger than a P4 (as in the examples of the Locrian, Whole Tone and Octotonic scales above)—often we may need a 5th or a 6th. In playing 10ths across the string, such as in the Haydn D-major concerto, we are playing a distance of a 6th on the top string between the thumb and third fingers, or an octave between the thumb and first finger across the string. Any interval is possible between the thumb and the third finger on the same string, up to (or perhaps more than) an octave. This will be discussed next Blog on the Alexanian exercises.
Analyzing passages in the repertoire using Tetrachords can be very useful. For example, in this passage from the 3rd movement of the Saint-Saens Concerto we can see that there are groupings of Major Tetrachords, Minor Tetrachords, Octotonic Tetrachords and Modal (Phrygian) Tetrachords. The numbers in this example show the fingering patterns; the colored lines show the tetrachords (not the bowings).
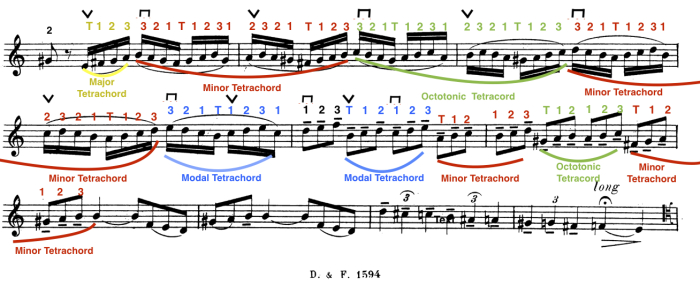
In the second half of this passage the thumb works like a percussive finger, lifting each time it moves back. More about this in the next blog (#21) with exercises by Alexanian for the moveable thumb.
Subjects: Practicing, Technique
AUTHOR